Sub Plan
Interactive Drawings
1. Brainstorm ideas of simple drawings.
(animals, plants, motor vehicles, people, school supplies, etc.)
YOU MAY NOT COPY ANY OF THE EXAMPLES THAT YOU SEE HERE
2. Gather resources to help you draw your idea.
Look at books, magazines, or do an image search.
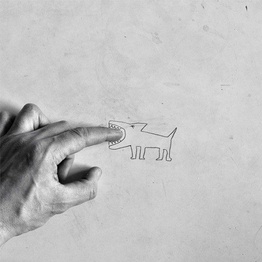
3. Brainstorm ideas of how your drawing could interact with a real object in a photograph, like the picture to the left. The drawing of a dog is interacting with the hand. (You may NOT show your face in the picture)
4. Draw your drawing on blank white paper. Use only pencil or sharpie marker. No color please. Feel free to cut out images if you think that will make your idea stronger. Think about your composition and how it will also set up in a photograph.
5. Finish your drawing and set up your photo shoot. You might have to gather supplies or ask for a partners assistance. Get an iPad from the cart outside the art room. The ones that Mrs. Sayre's class uses.
6. Open the camera on the iPad and frame your shot. Meaning center your subject matter (your drawing interacting with the object) and take the picture. Take a few if you like, but delete the ones that you will to use after you're finished. You should have one finished photograph saved to the camera roll. Remember, your face CAN NOT be in the photo.
7. Go back to your home screen and open safari.
8. Type in the address: www.artsonia.com/class (it should be bookmarked)
9. Copy and paste the access code from here or type it in to the box on the website.
The access code is: ZDXF-WMWS-RHHX
10. Click: LOGIN
11. Find your classroom teacher's name, find your name and click on your name.
12. Click the orange button that says, ADD NEW ARTWORK
13. If your name pops up, click the green button that says, YES THAT"S ME :)
14. Click the orange button that says CAPTURE IMAGE
15. Click the option on the bottom that says CHOOSE EXISTING
16. Click on your Camera Roll
17. Click on your picture
18. Click the green button that says, UPLOAD IMAGE
19. Click the green button that says, ACCEPT
20. Enter a title for your picture. This can be anything you like but should relate to you picture. It can simply be Interactive Drawing if you like.
21. Click the green button, SUBMIT TO TEACHER
22. Complete the questions. Type in complete sentences and SUBMIT TO TEACHER
23. Hit the blue button at the top of the page that says LOG ME OUT
24. Hit the red button at the top of the page that says CLOSE SESSION
25, Yeah, You're all done!
Mrs. Klausa will review your images and award you points based on your completion, composition, and creativity.
1. Brainstorm ideas of simple drawings.
(animals, plants, motor vehicles, people, school supplies, etc.)
YOU MAY NOT COPY ANY OF THE EXAMPLES THAT YOU SEE HERE
2. Gather resources to help you draw your idea.
Look at books, magazines, or do an image search.
3. Brainstorm ideas of how your drawing could interact with a real object in a photograph, like the picture to the left. The drawing of a dog is interacting with the hand. (You may NOT show your face in the picture)
4. Draw your drawing on blank white paper. Use only pencil or sharpie marker. No color please. Feel free to cut out images if you think that will make your idea stronger. Think about your composition and how it will also set up in a photograph.
5. Finish your drawing and set up your photo shoot. You might have to gather supplies or ask for a partners assistance. Get an iPad from the cart outside the art room. The ones that Mrs. Sayre's class uses.
6. Open the camera on the iPad and frame your shot. Meaning center your subject matter (your drawing interacting with the object) and take the picture. Take a few if you like, but delete the ones that you will to use after you're finished. You should have one finished photograph saved to the camera roll. Remember, your face CAN NOT be in the photo.
7. Go back to your home screen and open safari.
8. Type in the address: www.artsonia.com/class (it should be bookmarked)
9. Copy and paste the access code from here or type it in to the box on the website.
The access code is: ZDXF-WMWS-RHHX
10. Click: LOGIN
11. Find your classroom teacher's name, find your name and click on your name.
12. Click the orange button that says, ADD NEW ARTWORK
13. If your name pops up, click the green button that says, YES THAT"S ME :)
14. Click the orange button that says CAPTURE IMAGE
15. Click the option on the bottom that says CHOOSE EXISTING
16. Click on your Camera Roll
17. Click on your picture
18. Click the green button that says, UPLOAD IMAGE
19. Click the green button that says, ACCEPT
20. Enter a title for your picture. This can be anything you like but should relate to you picture. It can simply be Interactive Drawing if you like.
21. Click the green button, SUBMIT TO TEACHER
22. Complete the questions. Type in complete sentences and SUBMIT TO TEACHER
23. Hit the blue button at the top of the page that says LOG ME OUT
24. Hit the red button at the top of the page that says CLOSE SESSION
25, Yeah, You're all done!
Mrs. Klausa will review your images and award you points based on your completion, composition, and creativity.
